Showing posts with label adobe. Show all posts

Friday, May 9, 2014

Quick ColdFusion WebSockets Gotcha

I've been playing around with CF WebSockets for a few days now and have just started to work on message filtering.  Through the use of a selector I can target messages to a single client (or range of clients).  This is great, as there was a bug in the implementation of Flash Remoting and ColdFusion that broke filtering.  This meant that I had to send messages to all connected clients and filter on the client side, which as you can imagine is noisy.

Here is the Javascript I am using to subscribe and publish where ws is the ColdFusion WebSocket object created with the cfwebsocket tag:
ws.subscribe("messaging.friends", {userid: $('#userid').val(), selector: "targetuser eq '"+userselector+"'"}, friendsCallback);

...

ws.publish("messaging.friends", $("#message").val(), {targetuser: $('#userid').val()});
The simple code above subscribes to the messaging.friends subchannel using a selector that jQuery grabs from a web form.  The second line of code published a message to that channel with the same targetuser to match the selection criteria.

When I tested filtering I found that all of my messages were being delivered regardless of filtering criteria.  I had read previously that if your channel listener CFC implemented the canSendMessage() method, that this would occur.  I had removed the offending function but all of my messages continued to arrive regardless of selector criteria.

After much frustration I restarted ColdFusion and everything started working.  What seems to have happened is that when CF the Java creates classes from your CFC it picks up on changes within a method, but does not pick up that a method has been removed until the server is restarted (or if the application ends would be my guess).  Hope this saves someone some time.

Thursday, September 1, 2011

Accessing the Twitter Streaming API from Adobe Flex/AIR

Over the weekend I discovered an interesting new hobby, so being the geek that I am I wrote a mobile application to support it. I found that I really like watching the pictures people post on Twitter in real-time. This was based around hurricane #irene so seeing the incoming photos was awesome, although I suppose it could also be applied to even more interesting endeavors like #friskyfriday (NSFW) ;) In the application I wrote I wanted to connect to the Twitter live stream instead of using search. Although it doesn't send you the full firehose of tweets, I wanted everything in real-time for geek-ability.

I won't post all the gory details of getting this application up and running, but there were two things that anyone developing for this API will need to do, and here they are:

1. Connect to the Streaming API


I had tried to do this in the past and had much more luck using curl or Java to coax the tweets out of the Streaming API, but this time I wanted to do it all in ActionScript as I didn't want to keep track of anything in a database. I wanted real-time streaming of data as it came in, and nothing historical. To do this I used the URLStream class. URLStream opens a HTTP request and then downloads the received data as it comes. URLStream is especially suited to this type of request as the download does not have to finish before you can access the downloaded bytes. This means two things: 1) You can read the bytes as they come and maintain the connection to keep receiving bytes, and 2) you must be super careful, as the Streaming API sends chunks of data. This means that the last chunk you received from Twitter might not be a complete object. You can imagine what this does to the parser (more on this later).

The Streaming API current supports both basic and OAuth authentication. Twitter says that basic authentication is deprecated, so use at your own risk. This article will use basic auth as OAuth and Twitter has been done to death on
other blogs.

While setting up the stream controller, we will create a property that will hold our URLStream. This must exist in the scope of the controller as all of the events will interact with this stream as the URLRequest is processed.

private var stream:URLStream;
After instantiating the class we need to set up our URLStream. This is accomplished by defining a new request, setting the URI we want to hit, setting the basic auth parameters and finally adding event handlers to react to the data streaming in or any errors that might occur.

public function startStream():void {
  stream = new URLStream();
  var request:URLRequest;
      
  request = new URLRequest("http://stream.twitter.com/1/statuses/filter.json?track=&include_entities=1");
  
  // set up basic auth
  var encoder:Base64Encoder = new Base64Encoder();
  encoder.encode(appController.username + ":" + appController.password);
  var credentials:String = encoder.toString();
  var authHeader:URLRequestHeader = new URLRequestHeader("Authorization","Basic " + credentials);
  //add the header to request
  request.requestHeaders.push(authHeader);
  request.method = URLRequestMethod.POST;
  
  // in a real app I would also recommend handlers for SecurityErrorEvent.SECURITY_ERROR, IOErrorEvent.IO_ERROR at a minimum
  stream.addEventListener(ProgressEvent.PROGRESS, progressHandler);
  
  try {
    stream.load(request);
  } catch (error:Error) {
    trace("Bad URL.");
  }
}
A few notes about the code above... First, there is a track parameter being passed but it is currently empty. This allows you to filter your request. For my example I let the user enter this in on a prior view and passed it in via an application controller. Second, we are only listening for a single event, ProgressEvent.PROGRESS. In the real application I suggest you listen for at least security errors and input errors. You can also listen for HTTP status codes. This is important and Twitter would like for you to watch those codes and throttle your requests accordingly. Please make sure to do this or they will terminate your stream. Lastly, please note that we are requesting the response to be JSON. The streaming API only allows you to request JSON. Next, we need to define our handler. The one I am concerned with for this tutorial is the progress handler (it handles the ProgressEvent.PROGRESS event). When a progress event is received you can check the Stream object to see if enough bytes have been loaded to process the stream's data. In this application I didn't care how much data had been sent as I was more concerned with if the data available had any complete tweets (JSON objects) in it. To do this I fire off an event to another controller which processes the data.

private function progressHandler(event:ProgressEvent):void {
  // read the bytes
  var x:ByteArray = new ByteArray();
  stream.readBytes(x, 0, stream.bytesAvailable);
  
  // create an event to create the picTweets from the JSON
  var te:TweetEvent = new TweetEvent( TweetEvent.NEW_TWEET_RECEIVED );
  te.json = x.toString();
  // I'm using Swiz to dispatch my events - perhaps you should be also ;)
  dispatcher.dispatchEvent(te);
  
  trace("Progress Event Handled.");
}
We read the bytes from the stream as a ByteArray. The ByteArray data is then sent across to the other controller as a string using a custom event. The custom event looks like this:
package events
{
  import flash.events.Event;
  
  public class TweetEvent extends Event
  {
    public static const NEW_TWEET_RECEIVED:String = "events.TweetEvent.NEW_TWEET_RECEIVED";
    
    public var json:String;
    
    public function TweetEvent(type:String, bubbles:Boolean=true, cancelable:Boolean=false)
    {
      super(type, bubbles, cancelable);
    }
  }
}

2. Parse the resulting data


The handler for this event takes the JSON response and adds it to any other text left over in the buffer from prior requests. We then need to parse the JSON text to look for complete objects to deserialize. Twitter made this easy. They send along a newline character at the end of each JSON object. Simply split() the JSON text on newline and you'll have an array of objects. By trying to deserialize any of these objects using the JSON class (available from the
as3corelib package) we can create tweet objects. Any text that can't be deserialized will be put back into the String variable that is holding the JSON data to be parsed with the next data stream response.

public function handleNewTweet(json:String):void {
  // add the new json to the text storage - this is a private var for this controller
  jsonText += json;
  
  // now parse through the text for newline chars, which denote the end of a JSON object
  var aJSON:Array = jsonText.split(/\n/);
  
  
  if ( aJSON.length ) {
    // clear the jsonText for appending any partial objects
    jsonText = '';
    
    for ( var i:String in aJSON ) {
      // try to deserialize, if we error, we dont have a complete object in that array, add it back to the queue (it will always be the last item in the array that fails, if any)
      // deserialize the JSON
      if ( aJSON[i].length ) {
        try {
          var tweet:Object = JSON.decode(aJSON[i]);
          
          var j:String;
          
          // HERE IS WHERE YOU CAN ACTUALLY PROCESS THE TWEET
          
        } catch ( e:Error ) {
          // here is where we add the partial object back into the jsonText variable - will be appended to the next response
          if ( aJSON[i].length && aJSON[i].indexOf('\r') != 0 ) { jsonText += aJSON[i]; }
        }
      }
    }
  }
}
For my purposes I just parsed the entities for media and displayed it within my application. You have the full status object to play with for your application. Have fun, and if you use this drop me a comment so I can check it out!

Wednesday, August 31, 2011

ColdSpring Setter Injection versus Constructor Arguments Snafu

I was troubleshooting an issue a colleague of mine was having the other day, where to his credit he was following best practices but it shot him in the foot. Wanted to mention it here quickly.

Most times when you are injecting a bean into another bean in ColdSpring you will use setter injections. They look like:

<bean id="bean1" class="com.nictunney.Bean1"/>

<bean id="bean2" class="com.nictunney.Bean2">
  <property name="Bean1">
    <ref bean="Bean1"/>
  </property>
</bean>

Bean2 defines a mutator (setter) method, setBean1(). ColdSpring will inject the Bean1 into Bean2 when Bean2 is created by explicitly calling Bean2.setBean1(bean1). This is a best practice when performing dependency injection to prevent circular dependencies.

So the problem we were encountering in code was that the Bean2 constructor was calling a method that relied on the Bean1 property, which was of course undefined during the instantiation. It took a little while to track this down as this was a Model-Glue subapplication with lots of other stuff that could have been creating the error.

So, the lesson learned is to remember how ColdSpring and DI works. ColdSpring is going to create an instance of a bean, call the bean's constructor and then perform any necessary setter injections. It all makes perfect sense, except when you least expect it ;)

The answer in this case was to determine if a circular dependency would occur, which in our case it wouldn't, and instead inject the dependent bean via a constructor argument like this:

<bean id="bean1" class="com.nictunney.Bean1"/>

<bean id="bean2" class="com.nictunney.Bean2">
  <constructor-arg name="bean1">
    <ref bean="Bean1" />
  </constructor-arg>
</bean>

In the constructor call setBean1(arguments.bean1).

Wednesday, August 24, 2011

Are you ColdFusion Curious?

There is always lots of buzz about Adobe ColdFusion across social networking channels from developers. Most of it is positive, but ColdFusion also takes some abuse from programmers who have not used it. This criticism then gets met with some pushback from well-meaning CF developers, which in turn makes the bulk of us look like rabid loyalists.

Unfortunately for those scouring for information on language pros or cons, many of the negative statements are misinformed, heresy, and some of it is just good-natured ribbing (which I encourage as I do the same). I'd like to challenge all of you who use a web development language like Ruby, PHP, C# and ASP to take a single hour and attend one of the Adobe ColdFusion Developer Week sessions and challenge yourself to check out CF and see just how productive it can be. Don't worry, I won't tell any of your friends you were there ;)

Sunday, August 14, 2011

Android Mobile Application Connection Issues with Flash Remoting and ColdFusion

I was debugging an application tonight that uses Flex to connect an Android mobile application to ColdFusion via Flash Remoting. Every time I tried to call the remote method via the RemoteObject I got the message:

Channel.Connect.Failed error NetConnection.Call.Failed: HTTP: Failed

So I checked my LAN settings and then played around with my Mac firewall control panel. It was disabled so I was baffled. I then came across this post that hinted that it could be my usage of the CheckPoint VPN-1 SecureClient. Disabling and closing the client had no effect, so eventually I figured out I had to just disable the security policy (Tools > Disable security policy). I hope this helps someone out there from ruining an otherwise perfectly good evening of coding!

Wednesday, August 10, 2011

Dear ColdFusion Team: Please fix this stuff in Zeus

I love ColdFusion. I've built a 13 year career out of it (so far). I want to see CF continue to be a great language. Here are a few things I see that need to be addressed:

1. Shorthand for creating structures
This is one of those things that I'm not sure how it got put into the language, but lets fix it now before it becomes one of those embedded issues we just have to accept for version after version like 1 based array indices (more on that later). Fix it now!

// current
myStruct = {key="value"};

// suggested
myStruct = {key:"value"};

2. Arrays should be zero-indexed
This is one I've mentioned on for years. The standard across every other language is to use zero based indices. Why CF didn't do this from the get-go is an enigma to me. It is a PITA and requires a different sort of looping criteria as well as a different sort of index allocation during creation (unless you are using arrayAppend()). I would like to suggest making this backwards compatible by offering an application level variable that will permit you to enable the old 1 based indices while you are converting apps or maintaining legacy apps.

3. Looping over Arrays (item versus index)
This is a biggie that was discussed on other blogs recently. When I loop over an array in tags I do this:
<cfloop array="#myArray#" index="item">

This makes no sense. An index is just that, the current array index you are looking at. In CF this actually returns the item specified by the current index. I cannot get the current index without searching my array. The correct way to implement this would be to allow the user to specify either attribute. This would also prevent the user from having to track the index via an incrementer. I have had to do this frequently when trying to match up the current array with another array with related data.

<cfloop aray="#myArray#" index="i" item="item">

In this loop index would refer to the current index, and item would refer to the current item - makes sense right?

4. Looping over queries in CFScript
The way to do this currently is to loop from 1 to qry.recordCount. This isn't terrible, however I'd like to see this updated as such:
for ( row in myQuery ) {
}

The same could be said for an array loop.
for ( item in myArray ) {
}

5. Clean up object functions
Let's catch up with other languages on this one. len(), arrayLen() etc. Instead, I should be able to use a variable.length function regardless of the type (string or array). Also arrayAppend() (myArray.push()), arrayGetAt() (myArray.getAt(), myArray.pop()), listAppend() (myList.addItem()), etc. There are tons of them that should be addressed. You don't need to do anything but deprecate these existing functions for a few versions.

6. Query() object
Well, this one is tricky, as I've been trying to come up with a better way of handling this myself. Going back to the early days of ColdFusion (back when we called it Cold Fusion ;) ) the initial selling point of the language was the ability to interact easily with databases. This was so much the case that IIRC the tag was actually prefaced db and not cf! is a very simple way to access queries, and I continue to use it as opposed to its script counterpart. In fact, this is so much the case that I have to write my DAOs in tag based syntax instead of using script, which would be preferred.

I'm not going to go into all the reasons I dislike the current script based query syntax, but my biggest issue currently is with how query params are assigned. I'd recommend this approach:

var myQuery = new Query({
sql: "SELECT col from table where id = new queryParam({value: arguments.id, cfsqltype: 'CF_SQL_VARCHAR'})",
datasource: application.dsn
});

Having to use a Query object is also a bit frustrating although I think I can just tack execute().getResult() onto the statement above, but I'd have to check. It would be much easier to wrap the query object and have it call a query function, which in turn would function just like cfquery:

var myQuery = query(sql="SELECT col from table where id = new queryParam({value: arguments.id, cfsqltype: 'CF_SQL_VARCHAR'})", datasource: application.dsn);

Those are some initial thoughts for ColdFusion syntax changes. Please feel free to post your own in the comments below.

Sunday, August 7, 2011

Intro to Swiz Framework for Flex - Presentation Slides

Thanks to all of those who attended my session at RIACon.  Here are my presentation slides for reference.


Wednesday, April 27, 2011

CF Builder Express Edition - Yeah, It's free!

Some big news from Adobe was released today: ColdFusion Builder will now have an express edition. What this means is that after your CFB trial expires, you will be able to continue using Builder save a few features that will be disabled. It is up to you to determine if those features are worth the $300 price tag.

Here are some of the features that will not be available in the free edition:

  • Code Assist for Extensions
  • Code Insight
  • Extension Callbacks
  • Connections to remote CF Servers
  • Quick Fix
  • Remote Project Debugging
  • Refactoring
  • ColdFusion Search
  • Code Formatting
  • FTP Support
  • Log Viewer
  • Local File Browser
  • Code Hyperlinks
  • Hover Help

For me, I use some of those features and the time savings is worth the $109 upgrade price. You'll have to make that decision for yourself, but regardless, CFB Express is still full featured.

Here is a link to all ColdFusion Builder 2 Features for comparison.

Friday, October 22, 2010

Flex Skins Demystified (for Developers)

As a developer, I can always appreciate when languages make it easy to provide a clear separation of model and view (think MVC).  In ColdFusion we utilize a framework to produce these results.  Flex also allows us to use frameworks or apply common design patterns to our code for a separation of concerns.  Flex 4 introduced a native way to separate model from view utilizing spark skins.  This is largely to improve separation of workflow between designers and developers, but for MVC nuts, it serves us well.

I've trodded through several examples online and am assembling this tutorial a as way for developers to get started utilizing skins.  There are two primary types of skinning to get started with.  The first is skinning a native Flex component.  This takes place when you want to skin an existing component such as the spark.components.Button class.

The second type of skinning is for Flex custom components.  Skinning a custom component is much the same as skinning a native Flex component.  Your custom component can extend any class that extends SkinnableComponent.  When using Spark components, this is pretty much any visual component (another great reason for you to deprecate using mx based components in your apps for their spark counterparts).  A recent example I needed to skin was a button with multiple images.  I was able to create a subclass of spark.components.Button and add my images easily, unlike the hoops Flex 3 imposed.

Spark introduced a few new base containers for our use.  spark.components.SkinnableContainer works like a Canvas, but it is a subclass of SkinnableComponent (note that Group is the spark counterpart to Canvas, but is not skinnable).  For our example we will be extending SkinnableContainer to create a custom 'mirror' component.  For kicks we are also skinning a Button. This example is easy so as not to delve to deeply at first, but should get you started to more in-depth topics like skin states.  The final product looks like this:


First, we are going to tackle the Button skin. Flash Builder's workflow for creating a skin is very straightforward.  Name your skin and pick what component (or component skin it models, and Flash Builder will copy the contents of the base skin into your new file.  To create our button skin in Flash Builder, we select New > MXML Skin.  After naming our skin we can select the host component.


The skin includes many sections, two of which we will focus on immediately:

32:  [HostComponent("spark.components.Button")]  

HostComponent tells the skin what component we are basing our skin on, and therefore gives us access to the properties of that class for use within the skin itself like style definitions.  You can technically refer to any property including data proerties, but since we are trying to separate our view layer, that seems counterintuitive ;)  The Button class itself defines SkinParts, which are a powerful way to separate all data from the design (more on SkinParts in our other example below).  For our button we want to add an image, which is very easy to do.  We could also change any SkinPart (like shadow) or state (like down or over), or even modify SkinParts only within a specific state (like what the shadow looks like when you hover over the button).

The second part we will look at is the MXML that defines the Button component view.  In a Skin we can add any markup.  Within a Skin each component has "includeIn" and "excludeFrom" attributes to determine when a component should be visible.  If the component should be visible at all times, do not use either attribute.  To add an image we use the spark.primitives.BitMapImage class:

209:  <s:BitmapImage source="@Embed('assets/nav_refresh_blue.png')" top="5" bottom="5" left="5" />  

Now that our button skin is ready to go, we need to create our ImageButton component. We are creating the ImageButton component as an MXML file in this instance, but could also create it in ActionScript (which is shown in the next example).

ImageButton.mxml
1:  <?xml version="1.0" encoding="utf-8"?>  
2:  <s:Button xmlns:fx="http://ns.adobe.com/mxml/2009"   
3:       xmlns:s="library://ns.adobe.com/flex/spark"   
4:       xmlns:mx="library://ns.adobe.com/flex/mx" skinClass="com.nictunney.skindemo.view.skins.ImageButtonSkin">  
5:  </s:Button>  
6:    

Skins are bound to components using the "skinClass" attribute.  There is absolutely nothing else to note here now, but we could add any properties or functionality in this file. Implementation of this ImageButton class will be shown at the end of this post.

For the next example we will be skinning a custom Flex component named MirrorGroup. The component doesn't do much other than display text, and then mirror the text back on the same line, reversed. To show that the component does not have to be created in MXML, this example uses all ActionScript. Our custom component extends SkinnableComponent so we can inherit the skinnable actions and parts of that base class.  The component itself is simple, with caveats:

MirrorGroup.as
1:    
2:  package com.nictunney.skindemo.view  
3:  {  
4:    import com.nictunney.skindemo.view.skins.MirrorGroupSkin;  
5:      
6:    import spark.components.Label;  
7:    import spark.components.supportClasses.SkinnableComponent;  
8:      
9:    public class MirrorGroup extends SkinnableComponent  
10:    {  
11:      [SkinPart(required="true")]  
12:      public var plainText:Label;  
13:      [SkinPart(required="true")]  
14:      public var mirrorText:Label;  
15:        
16:      public var content:String;  
17:        
18:      override public function stylesInitialized():void {  
19:        super.stylesInitialized();  
20:        this.setStyle("skinClass",Class(com.nictunney.skindemo.view.skins.MirrorGroupSkin));  
21:      }  
22:        
23:      override protected function partAdded(partName:String, instance:Object):void  
24:      {  
25:        super.partAdded(partName, instance);  
26:          
27:        if( instance == plainText || instance == mirrorText )  
28:        {  
29:          instance.text = content;  
30:        }  
31:      }  
32:        
33:    }  
34:  }  

SkinParts are really cool (lines 11-14). What they define is a contract between the designer and the developer. The developer provides a list of SkinParts to the designer as IDs, Flex component type, and if they must implement the SkinPart. The designer then creates the skin with those matching IDs and types. The SkinPart metadata tag in the MirrorGroup component tells Flex to join them up, hence linking data to view at runtime. I know this workflow was completely developer focused and backwards, but you get the idea ;)

The caveats to using an AS3 class instead of MXML that just plain sucked (until I found the right blog posts):
  1. Since we are attaching the skin in ActionScript, we must override the public stylesInitialized() method (lines 18-21).  This code comes from SEFOL.  In ImageButton.mxml this was not necessary as we specified the skinClass attribute in the component definition.
  2. We need to override the protected partAdded() method and delay processing of any properties of a SkinPart until they are added to our component from the Skin (lines 23-31).  If you do not do this you will get errors complaining about null references.  This code comes from Ryan Stewart.
The next step is to create the Skin.  Selecting New > MXML Skin in Flash Builder allows us to provide two important pieces of info:

The differences from when we created the button example are that we can specify the custom component MirrorGroup as the HostComponent, and we specify that it should create our Skin file as a copy of SkinnableContainerSkin, which is the default skin for SkinnableContainer, which we extended to create MirrorGroup.  Using the base skin gets us light years ahead.  Here is the finished Skin:

MirrorGroupSkin.mxml (stripped out boilerplate comments and ActionScript for brevity)
1:  <?xml version="1.0" encoding="utf-8"?>  
2:    
3:  <s:Skin xmlns:fx="http://ns.adobe.com/mxml/2009" xmlns:s="library://ns.adobe.com/flex/spark"   
4:    xmlns:fb="http://ns.adobe.com/flashbuilder/2009" alpha.disabled="0.5">  
5:    <fx:Metadata>[HostComponent("com.nictunney.skindemo.view.MirrorGroup")]</fx:Metadata>  
6:    
7:    <s:states>  
8:      <s:State name="normal" />  
9:      <s:State name="disabled" />  
10:    </s:states>  
11:      
12:    <!--- Defines the appearance of the SkinnableContainer class's background. -->  
13:    <s:Rect id="background" left="0" right="0" top="0" bottom="0">  
14:      <s:fill>  
15:        <!--- @private -->  
16:        <s:SolidColor id="bgFill" color="#FFFFFF"/>  
17:      </s:fill>  
18:    </s:Rect>  
19:      
20:    <s:HGroup id="contentGroup" left="10" right="0" top="10" bottom="0" minWidth="0" minHeight="0">  
21:      <s:Label id="plainText" />  
22:      <s:Label id="mirrorText" layoutDirection="rtl" alpha="0.3" />  
23:    </s:HGroup>  
24:    
25:  </s:Skin>  
26:    

Line 5 shows the HostComponent has been properly referenced. The standard SkinnableContainerSkin that was copied for us comes loaded with a spark Group with a basic layout.  We have replaced this with a HGroup and two labels.  Notice all of our styling has been implemented in the skin, but our values are nowhere to be seen?  The SkinParts we defined in MirrorGroup are seen here (matching IDs are a must) as "plainText" and "mirrorText".

The final step is to create an application and use the custom components and skins.

1:    
2:  <?xml version="1.0" encoding="utf-8"?>  
3:  <s:Application xmlns:fx="http://ns.adobe.com/mxml/2009"   
4:          xmlns:s="library://ns.adobe.com/flex/spark"   
5:          xmlns:mx="library://ns.adobe.com/flex/mx" minWidth="955" minHeight="600"  
6:          xmlns:view="com.nictunney.skindemo.view.*">  
7:      
8:    <s:VGroup top="10" left="10">  
9:      <view:ImageButton label="Toggle Mirror Visibility" click="mirrorGroup.visible = !mirrorGroup.visible" />  
10:      <view:MirrorGroup id="mirrorGroup" content="This is my text to mirror" />  
11:    </s:VGroup>  
12:      
13:  </s:Application>  
14:    

That's it! We are telling the button what to do when it is clicked (toggle visibility of the MirrorGroup). The text is also being passed into the MirrorGroup as its content property. Flex handles the rest!

Full code here

Monday, August 23, 2010

More ORM Weirdness

NOTE: the first part here addresses CF 9.0.0.  9.0.1 does not fix this, but expands the weirdness.  9.0.1 behavior is the second half of this post.

In my last post I learned via @brian428 that the behavior was correct since the collections need to be loaded or else ORM doesn't know if they should be deleted from the collection or not.  EntityMerge() did not work, but loading based on length of the passed ID did (again, thanks Brian).

The new weirdness is when I return the loaded object back via JSON.  There are two child collections: Entities and FocusAreas.  Entities are null and lazy loaded.  FocusAreas contains one record, and is also lazy loaded.  Note the JSON:
{"obj":{"entities":[],"id":"8ab2932d2a8529d6012a856916c40002","focusareas":,"errors":[]}
See that focusareas returns nothing, whereas entities returns an empty array. The error comes on the client since when I eval() in JavaScript it tries to set focusarea to ',"errors":[]}' and then sees no proper closing for the JSON string. Setting lazy="false" on the focusareas relation fixes the issue, but then I have to return the focusareas, which I do not need. What I would expect to see is:
{"obj":{"entities":[],"id":"8ab2932d2a8529d6012a856916c40002","focusareas":[],"errors":[]}
The error would be fixed by setting the value of getFocusAreas() to an empty array upon initialization.

So here is where Brian suggested I install the CF 9.0.1 updater.  At first I was pleased.  When I returned the value after an entitySave(), it did not return entities or focusareas.  w00t!  To be sure, I then loaded the focusareas with getFocusAreas().  They still were not returned!  Setting lazy="false" also had no bearing.  There was nothing I could do to get them to return.  For a sanity check I dumped the parent object right before the return and got this:


I've cleared my cache and restarted CF.  The returned JSON is still:
{"obj":{"id":"8ab2932d2a8529d6012a856916c40002","title":"Test Project"},"errors":[]}

Monday, August 2, 2010

My first Swiz Application

So I'll be doing more Flex development in my new position (and will also be touching CF a bunch more as an aside), and I decided to take another look at Swiz. I'm not a big frameworks guy, but in Flex there is a definite need to mediate events which I know Swiz does well, so I decided to take a peek.

I decided to hit a few things at once with my first Swiz application, a sort of technical spike for the project work I will be doing. For this example I needed to map relationships between entities. I found Mark Shepherd's SpringGraph component which sounded like what I needed. It
"displays a graph of objects that are linked to each other, using a force-directed layout algorithm".
Perfect.

Next, I needed a persistence layer. I've gotten to play around with CouchDB a bit for prototyping, so I decided it would be great for this proof of concept. Why?
  1. Dynamic model
  2. Static queries (views)
  3. Restful interface
The latter is the most important to me here since, while the first two are important in the long run, a restful interface means I do not need a service layer to proxy my db requests. I've enjoyed prototyping in CouchDB previously and this got me up and running quickly. If you don't already have CouchDB installed and are on Windows, there is a windows binary installer that works nicely. I named my database 'swizsample'. After you create the database you can copy this file into your data directory to load the data for this example (Linux: /usr/local/var/lib/couchdb/ or Windows: %couch%\var\lib\couchdb\).

After installing Flash Builder 4 (with the Flex 4.1 SDK) as a plugin to eclipse, I grabbed my necessary libraries (included in the attached sample project):

3. as3corelib 0.93 (for deserializing JSON)

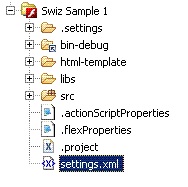
After reviewing the Swiz sample applications and reading the documentation (not a ton of documentation is by design here) I created the following directory structure, simplistic since the app is a POC:


I then needed to tell Swiz where my application resources are located. In my Main.mxml file I added a few namespaces to my Application tag:
  1. xmlns:view="com.nictunney.view.*" - So I can import my base view
  2. xmlns:config="com.nictunney.config.*" - So I can tell Swiz where my config file is located
  3. xmlns:swiz="http://swiz.swizframework.org" - namespace for the Swiz framework
I then declared my Swiz configuration in Main.mxml using the swiz component tags beanProviders and config:
<fx:Declarations>
<swiz:Swiz>

<!-- BeanProviders simply contain the non-display objects that Swiz should process. -->
<swiz:beanProviders>
<config:Beans />
</swiz:beanProviders>

<swiz:config>
<!-- The eventPackages value tells Swiz the path to your Event classes,
and viewPackages is an optional value that speeds up the processing of display classes. -->
<swiz:SwizConfig
eventPackages="com.nictunney.event.*"
viewPackages="com.nictunney.view.*" />
</swiz:config>

</swiz:Swiz>
As you can see from the comments, I point beanProviders to my Beans.mxml configuration file. In this simple example I can put all of my bean configuration data in a single file, but you may have more depending on your architecture.
<swiz:BeanProvider
xmlns:fx="http://ns.adobe.com/mxml/2009"
xmlns:swiz="http://swiz.swizframework.org"
xmlns:model="com.nictunney.model.*"
xmlns:control="com.nictunney.control.*"
xmlns:service="com.nictunney.service.*">

<service:MapService id="mapService" />
<control:MapController id="mapController" />

</swiz:BeanProvider>
As you can see above, I included my service and controller components for my map object (named map since we will be drawing a relationship map). Take a peek in the MapService.as class and you will see loadItems(), which makes an HTTP call to the CouchDB restful interface to retrieve a view (no queries, only document views in CouchDB). The successful result will call the httpResult method in the same class (more on that logic later).

The aptly named MapController.as class serves as a controller interface for the map service. Note that it makes use of the Swiz [Inject] metadata tag. This is clutch as the [Inject] metadata tag is performing a dependency injection by type here (as recommended by the Swiz docs) based on the definition in the Beans.mxml file. We can now reference the current state of the MapService using the mapService pointer (as seen on line 17).

I defined a single custom event for the application. Nothing to note here except that when calling the constructor on the Event superclass, you need to set the 'bubbles' property to 'true' (see line 13 in MapEvent.as). To hold the data there is a single GenericItem class defined. No real magic going on here either.

So, aside from the dependency injection, where else does Swiz get involved in the app? Glad you asked. Again, I feel that event mediation is the primary reason to use a framework in Flex. Code in Flex is pretty self organizing, but events can be a bear across a complex model with multiple views. Swiz handles event mediation well. If you take a peek at Map.mxml (the only view defined for this sample application), aside from the view and function to handle the SpringGrpah itself, there are two things of note handled by Swiz.

First, event mediation really is as simple as the following code:
[Mediate( event="MapEvent.PLACE_ITEM_REQUESTED", properties="item" )]
public function newItem(item:GenericItem): void {
trace('[Swiz] Mediating MapEvent.PLACE_ITEM_REQUESTED for item.' + item.id + '.');
var i: Item = new Item(item.id);
i.data = item;
g.add(i);
if(prevItem != null)
g.link(i, prevItem);
prevItem = i;
s.dataProvider = g;
}
The [Mediate] metadata tag tells Swiz to call the newItem() function when the MapEvent.PLACE_ITEM_REQUESTED event is fired anywhere in our example application. Note that we can use MapEvent directly (and not the package name) since we defined the eventPackages attribute in our swiz config in Main.mxml. Another important point here is the properties property. By telling Swiz to pass in the item property from our event, newItem() can now be called explicitly from elsewhere in our code (see that no event is being passed into the function itself?

The original event is fired from the MapService class when the HTTP call is completed. Two things to note in MapService.as. Since it is not a UI component we need to create an instance of IEventDispatcher and let Swiz know to monitor events passed from it by specifying the [Dispatcher] metadata tag:

[Dispatcher]   public var dispatcher : IEventDispatcher;

This dispatcher is then used to send the events from our service. If we were dispatching an event from a UI component, Swiz would monitor it by default.

The last thing Swiz needs to know is where to start processing our application. For our needs we are telling Swiz to call the main() function in Map.mxml by using the [PostConstruct] metadata tag. [PostConstruct] is called after a display object is placed on the stage. Be sure to check out the Swiz Bean lifecycle management page for more information.

If you run the application in debug mode (make sure you have the debug Flash player) you'll see Flex load the SpringGraph instance onto the stage, Swiz call the main() function, triggering the MapEvent to fire, and newItems() receive the GenericItem objects and add them into the SpringGraph. Pretty sweet!

Source code for this example can be found here

Sunday, July 12, 2009

My Adobe ColdFusion 9 and ColdFusion Builder Article is Live

I had the pleasure of writing an article to be released with the Public Beta of CF9 (Centaur) and CF Builder (Bolt). I decided to write about SOA and how CF9 and ColdFusion Builder change the way you currently develop your service tier. Hope you enjoy it!

Reinventing SOA in Adobe ColdFusion 9 beta and ColdFusion Builder Beta

Other great CF9 and CF Builder articles:

Introducing Adobe ColdFusion 9 Beta (by Ben Forta)
Introducing Adobe ColdFusion Builder Beta (by Ben Forta)
Introducing ORM in Adobe ColdFusion 9 Beta (by Mark Mandel)
Getting started with ColdFusion Builder Beta (by Simon Free)

Thank you Adobe

I've been an Adobe fan for years, first got started with Photoshop back in version 6 and I've seen it through CS4. I was pretty stoked a few years ago when another product I've been with forever was purchased by Adobe: ColdFusion. Being a CF Junkie since the Allaire days, seeing it through Macromedia and the Adobe acquisition, living through the yearly '<insert company here> is going to discontinue ColdFusion' threads and generally enjoying being a Team Macromedia member and now an Adobe Community Expert for ColdFusion, I'm happy to announce that public betas of both ColdFusion 9 and ColdFusion Builder are being launched right at this very minute.

There have been quite a few announcements of new features coming out in ColdFusion 9 (codenamed Centaur) so I'll just hit a few of the most exciting to me:
  1. CFaaS (ColdFusion as a Service) - ColdFusion core services are available via web services such as PDF document management, email, charting and image manipulation.
  2. Enhanced CFSCRIPT support - that's right! The tag functionality we have been been breaking out of script for is now available in cfscript! No more switching back and forth... use script when it makes sense for the entire process, not just bits and pieces.
  3. Implicit getters and setters - I just cannot say enough about this feature. Thanks Adobe!
  4. Lots of changes to CFCs - too many to list, just go check the docs.
  5. Caching improvements - granular control of objects and page fragments to disk or memory cache.
  6. Portlets - Government shops will love this one. You can now expose ColdFusion applications as portlets in leading JEE portals.
  7. Desktop server manager - AIR app lets you manage multiple servers from the same console (even supports clusters).
There are a few other features that are cool as well, go check them out (links at the bottom of the post).

Now to the second release of the night - I've seen quite a few ColdFusion IDEs - having worked in ColdFusion Studio, Homesite+, instructing in Dreamweaver and rocking the house in CF Eclipse, and now I'm proud to have gotten to take a sneak peek at ColdFusion Builder, the first code centric IDE for ColdFusion put out by the parent company since Homesite! I have to say, it's very cool and very handy. It is built on Eclipse, so one IDE to rule them all. Code generation has been moved out of Flex Builder (now Flash Builder) and integrated into CF Builder. You can connect to CF exposed services right from the IDE, generate AS3 code, start and stop servers and <drumroll>STEP DEBUG</drumroll>. CF Builder also provides code hinting and insight the likes of Flash Builder :). It even supports code refactoring, meaning updating a function name in a CFC will update all references to that function within your project!

I'm pretty excited about this release. I was glad to see the release provides more under the hood performance and functionality than widget-type tags. Go see for yourself:


Now the fun bits:
ColdFusion 9 Public Beta
ColdFusion Builder Public Beta

Developing Applications with ColdFusion 9
ColdFusion 9 CFML Reference
Installation Guide for ColdFusion Builder
Using Adobe ColdFusion Builder